Malware Analysis Fundamentals: A Guide to the PE File Format
Introduction
Before getting started in malware analysis, it is important to first understand the fundamentals. In this post, we will explore one of those fundamentals: the PE File format. Much of the Windows-based malware that we come across today, whether in the form of.exe or .dll files, will be of this file type. In this post, we’ll write our own “malware”, take a deep dive into the PE file format, and try out some tools to peer into the guts of the Windows executable.
Creating our own sample malware
Before we begin, we want some sample “malware” to work with. So, let’s make our own. Below is some very simple C code that uses the Windows MessageBox API to display a small message box on the user’s screen stating “You have been hacked!” This is a lie of course. The code does nothing else and is entirely benign. It is just an example for expository purposes.
#include <Windows.h>

int main()
{
	MessageBox(NULL, (LPCWSTR)L"You have been hacked!", (LPCWSTR)L"test", MB_OK);
	return 0;
}
I’ve compiled this code in Visual Studio to create an exe file called malware.exe. When we run this exe, it will create a process called malware.exe and this process will exit after the user clicks on the “OK” button in the message box. Very simple.
We can observe this simple process in action below. In Process Hacker we see that process begin (highlight in green) shortly after we double-click on malware.exe and then we see it end (highlight in red) shortly after we hit the “OK” button:
We will refer back to this sample throughout this post, so I’d encourage you to compile the above code to create your own malware.exe sample with which to work. We’ll come back to malware.exe shortly. Hopefully I’ve hooked you, because in the next section we need to go over some of the boring stuff. I’ll try to keep this brief but informative.
The PE file format
So, what exactly is a PE file? PE stands for portable executable. Several types of files fall under the PE umbrella, but the two of primary concern to us right now are .exe and .dll. The PE format is essentially a data structure that lays out all of the information, in a well-defined manner, that Windows needs to run the code in the file1. In their excellent book Malware Analysis and Detection Engineering, Abhijit Mohanta and Anoop Saldanha describe the PE file format as defining:
“…various headers that define the structure of the file, its code, its data, and the various resources that it needs. It also contains various fields that inform how much of virtual memory it needs when it is spawned into a process and where in its process’s memory to copy its various code, data, and resources”2.
Essentially, the PE file format provides all the information that Windows needs to run the executable code as a process. But how does this code become a running process in Windows? A PE file is loaded into memory as a process by a component of the Windows operating system called the Windows loader. The Windows loader understands all the information provided in the PE file format and uses it as a recipe for setting up and running the code in a process.
Structure of a PE file
The PE file format defines a number of headers and subheaders, each of which can contain a number of fields. The tree below provides a high level view of the PE file structure:
├── DOS Header
├── DOS Stub
├── NT Headers
  ├── File Header
  └── Optional Header
    └── Data Directories
├── Section Headers
└── Sections
Let’s briefly define each of the headers above.
DOS Header: The DOS header comprises the first 64 bytes of the PE file3. The DOS header defines a number of fields, some of which we explore below.
DOS Stub: This is a small MS-DOS program that runs when the executable is loaded into memory. It displays the message “This program cannot be run in DOS mode.” THe DOS header and the DOS stub are provided only for backwards compatibility with the MS-DOS format4.
NT Header: The NT headers encompasses the File Header and the Optional Header. It also contains the Signature field described below.
File Header: The File header, also known as IMAGE_FILE_HEADER, contains information about the file that informs Windows how to handle it, including the type of machine for which the code was written5. We’ll take a closer look at some of this information shortly.
Optional Header: This is also known by its formal name IMAGE_FILE_HEADER. Despite the name, the optional header is actually required for the .exe and .dll file types. It contains numerous fields that convey information to the Windows loader about how and where to load the executable into memory.
Section Headers: Each section header provides information about the sections in the PE file.
Sections: As mentioned above, the sections contain much of the data and code in the executable. Some of the more important sections are:
- .text: Contains the executable code
- .data: Contains initialized data
- .rdata: Contains read-only initialized data
- .bss: Contains non-initialized data
- .rsrc: Contains resources such as images
- .reloc: Contains information on image relocation
In addition to the headers, subheaders, and sections defined in the PE file format, there are also fields. Fields exist beneath a header or subheader and are essentially named values that provide information to Windows about the executable. If we add these fields to our diagram, we get something like below. Note that this is an abridged version that that only includes fields relevant to the discussion at hand. For a full listing of all the fields, refer to the Microsoft documentation here.
├── DOS Header
  ├── Field: e_magic
  └── Field: e_lfanew
├── DOS Stub
├── NT Headers
  ├── Field: Signature
  ├── File Header
    ├── Field: Machine
    ├── Field: NumberOfSections
    ├── Field: TimeDateStamp
    ├── Field: SizeOfOptionalHeader
    └── Field: Characteristics
  └── Optional Header
    ├── Field: AddressOfEntryPoint
    ├── Field: ImageBase
    └── Data Directories
 ├── Section Headers
 └── Sections
e_magic: This is the DOS signature, which for a PE file will always be the hex value 4d 5a (MZ in ASCII).
e_lfanew: This value, located at file offset 0x3c, provides the offset of the beginning of the NT header, which is also the PE signature (see next). This value provides the Windows loader with the information it needs to find and execute the image file despite the fact that it is preceded by the DOS stub6. The size of e_lfanew is double-word, or 4 bytes.
Signature: This value identifies the file as being of the PE format and also denotes the beginning of the NT header. Holds the 4-byte hex value 50 45 (PE in ASCII), followed by two null bytes.
Machine: Contains the processor type on which the PE file is intended to run. For a list of machine types and their associated values, see here.
NumberOfSections: The number of sections (see above) that the file has.
TimeDateStamp: Contains the binary representation of the file creation time as the number of seconds since 00:00 January 1, 19707.
SizeOfOptionalHeader: Contains the size of the optional header.
Characteristics: This field contains a number of flags indicating various file attributes. Currently there are 16 flags defined, however some are deprecated and no longer used8. We are only concerned with a few for this post. These are:
IMAGE_FILE_EXECUTABLE_IMAGE: Indicates if the file is executable.IMAGE_FILE_32BIT_MACHINE: Indicates if the file was created for 32-bit architectures.IMAGE_FILE_DLL: Indicates if the file is a DLL (dynamic link library).
AddressOfEntryPoint: The location of the first instruction in the program to be executed.
ImageBase: indicates the preferred location in virtual memory at which the Windows loader should create space for the PE file and its data.
The above is just a selection of information about the PE file structure and there is a lot more that we haven’t covered here. If you are a masochist who’d like to go deeper into the weeds, visit the Microsoft documentation here.
A first look inside malware.exe
Now, let’s move on to something more hands-on. How can we identify a PE file using what we learned above about the e_magic field? We can examine the first two bytes of the file in a hex editor to see if they are 4d 5a.
You may ask why we even need to do this. After all, shouldn’t the file extension tell us everything we need to know? Not exactly. File extensions in Windows are used for file association. The file extension just tells Windows what program to run the file. For example, if we double-click on a .docx file, Windows knows to use Word to open it. But changing the file extension doesn’t change anything about the file itself. A Windows executable whose extension is changed from .exe to .pdf is still a Windows executable. We may run into a situation for example where we suspect that a file is an executable even though it has a different file extension. Such a scenario occurs with malware frequently.
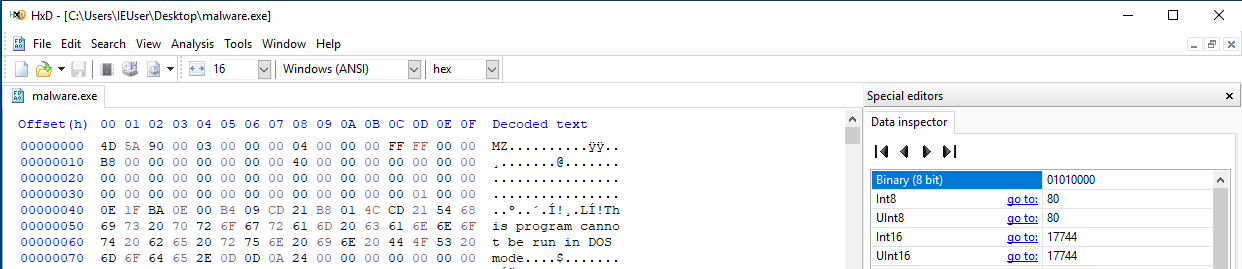
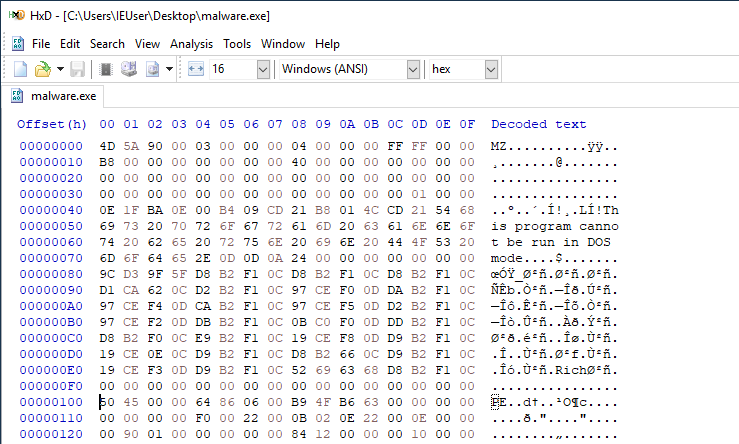
Opening malware.exe in any hex editor (here I use HxD Editor in Windows), we see that the first two bytes of the file are 4d 5a (‘MZ’ in ASCII), confirming that it is indeed a PE file. We can also observe the DOS stub string “This program cannot be run in DOS mode.”
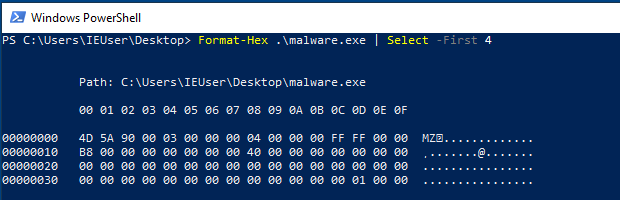
On a modern Windows system, we can also use the Powershell command Format-Hex to examine the raw hex of a file. Here I do so, limiting the output to just 4 lines. Again we see the 4d 5a signature.
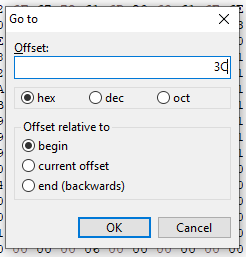
The next field we learned about was the e_lfanew field. We know that it is located at file offset 0x3c, is 4 bytes long, and provides the offset of the beginning of the NT header. Let’s find it. We can easily find offset 0x3c using Ctrl-G and entering 3c into the field, making sure the “begin” radio button is checked:
Upon doing so, our cursor is placed at that location:

Examining the 4 bytes starting from 0x3c yields 00 01 00 00, which is the value 0x100 in hex. Wait, you might say, this looks like 0x10000 to me. What’s going on? The PE file format uses what is know as ‘little-endian’ format to store integer values, which means that the least-significant byte is on the left and the most significant byte is on the right. So we actually read these bytes in reverse to obtain the value. By that I mean that we read the bytes themselves from right to left while the two characters that make up each individual byte retain their order. So, if we convert 00 01 00 00 from its little-endian format to a format more suitable for human readability, we get 00 00 01 00, which is 0x100 in hexadecimal. Although the concept of endianness is very important, it is outside the scope of this post. There are also plenty of online resources on the topic made by people far more qualified than I to discuss it. I suggest some research if you’d like to learn more.
So, we now know that the value of e_lfanew is 0x100. Next we can go to this location in the file using Ctrl-G as we did earlier:
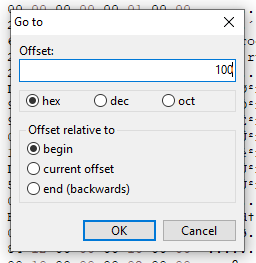
Upon doing so, we see that our cursor lands at offset 0x100. We’ve now reached the beginning of the NT header. If we’ve done so correctly, recall that we should now see the Signature, which should be the 4-byte value 50 45 00 00. This is indeed the case and we also see the PE value on the right:
PE analysis tools
Great. We can now identify a PE file and locate some important data within the file using a hex editor. But combing through an endless array of bytes when doing static analysis of malware quickly becomes tedious and inefficent. Fortunately, there are a lot of tools out there that can perform this parsing of bits and bytes for us and display the information that we are looking for.
Let’s begin with tools that will identify a PE file. Here are a few that I like to use; however this is by no means an exhaustive list. There are A LOT of tools out there used to inspect PE files.
On a Linux system the file command is a built-in utility used to identify file types:

Windows does not have an equivalent command-line utility out of the box. But you can install a tool such as trid, which works similarly:
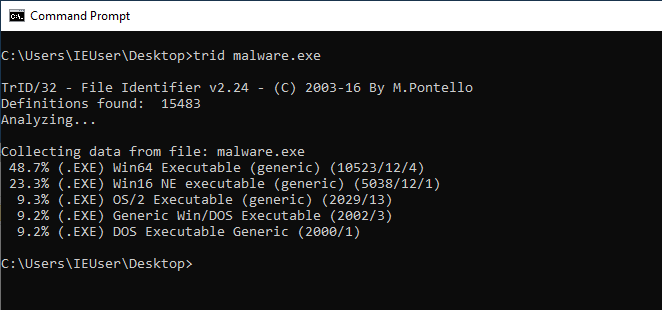
Rather than giving a single deterministic answer as the bash file utility does, trid provides several possible answers along with probabilities of its confidence. Above we see that its first choice is Win64 Executable.
Once we’ve correctly identified a file as being of the PE file type, there are a number of tools that allows us to extract its data automatically. Below is a short list of some of those tools. There are many more than what is listed, so consider this a starting point.
Windows
- CFF Explorer
- PEView (Currently has limited functionality when analyzing 64-bit files)
- PE-Bear
- PEStudio
Linux
Multi-platform
The tool you choose to use will be a matter of preference and platform. On Windows, I like CFF Explorer. Let’s use it for the final section of this post.
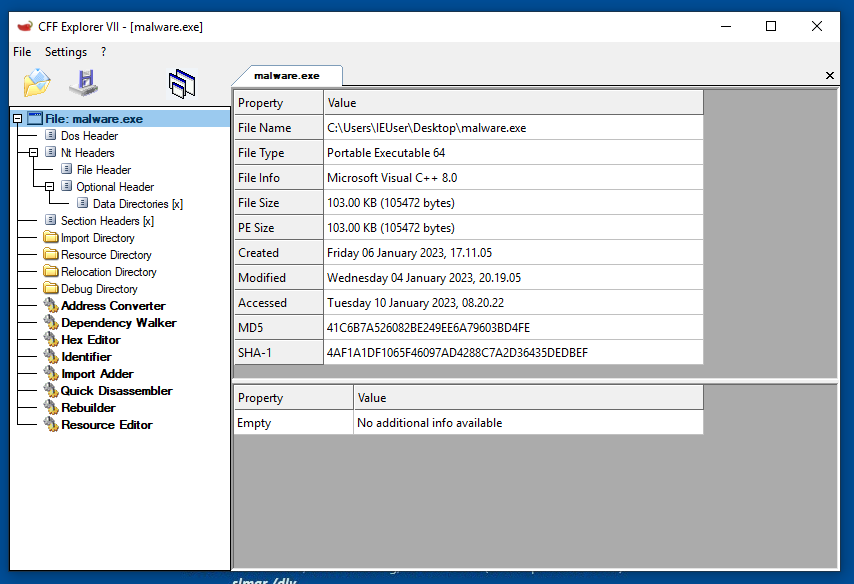
Installation of CFF explorer adds a context-menu to Windows that allows you to right-click any file and select “Open with CFF Explorer”. When we open malware.exe with CFF Explorer, we are greeted with the PE file structure and fields that we introduced above. These should look familiar:
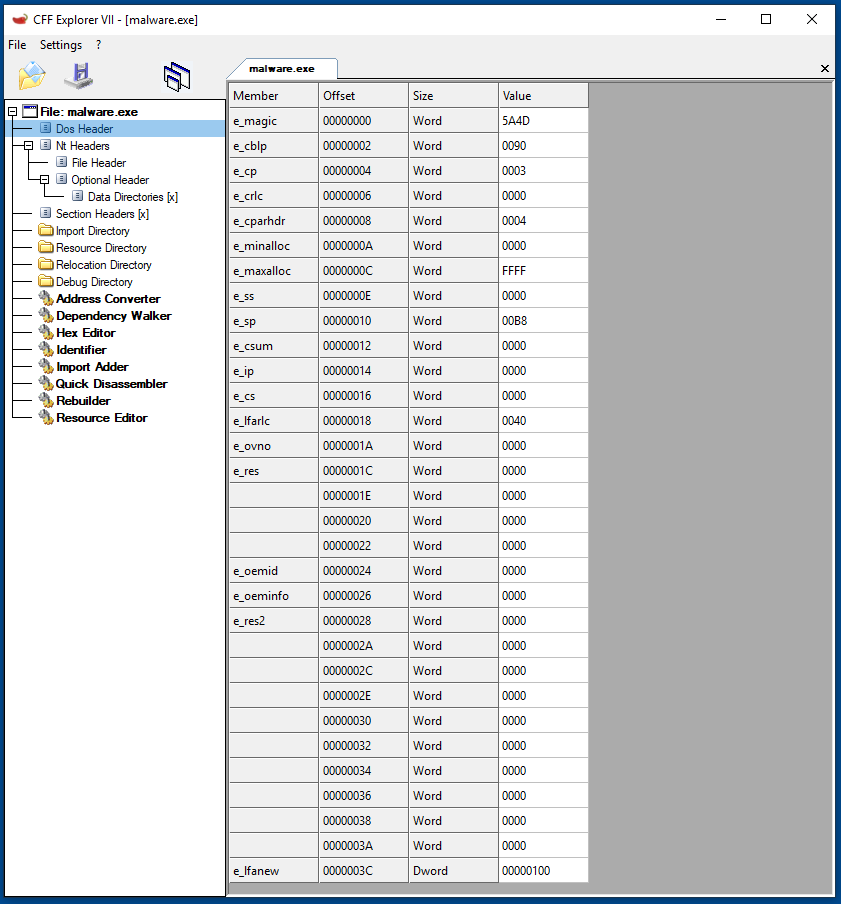
When we click on the DOS header, we are presented with its fields, including two with which we are now familiar-e_magic and e_lfanew:
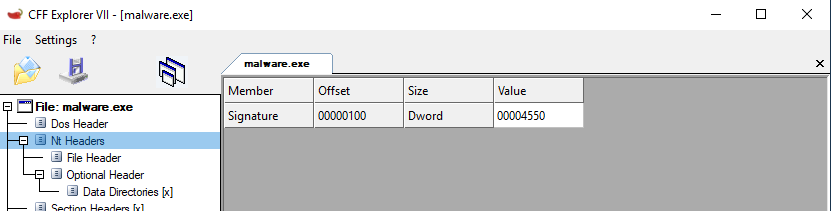
Examining the NT header, we see the familiar Signature field and the value we identifed earlier:
At this point you get the idea. We can continue to use CFF Explorer to investigate the values of the various fields listed above. I’d encourage you to do so yourself using whatever tool you prefer. Definitely investigate the Image File Header and the Optional Header. Using a hex editor, confirm some of the values of the fields that you see in your tool.
This guide was meant as an introduction to the PE file format and there is a lot more that we have not covered here. If you would like to learn more, again I’d suggest starting with the Microsoft documentation here. Hopefully you learned as much as I did while writing this article. I hope to continue this series with a deep dive into some other important aspects of the PE file and malware analysis, including the Import Address Table and the practice of packing.
References
-
Mohanta, Abhijit and Anoop Saldanha. Malware Analysis and Detection Engineering. New York: Springer Science+Business Media, 2020. ↩
-
https://resources.infosecinstitute.com/topic/2-malware-researchers-handbook-demystifying-pe-file/ ↩
-
https://learn.microsoft.com/en-us/windows/win32/debug/pe-format ↩
-
https://learn.microsoft.com/en-us/windows/win32/debug/pe-format#optional-header-image-only ↩
-
https://learn.microsoft.com/en-us/windows/win32/debug/pe-format#characteristics ↩